Transcript
by Josh Teder
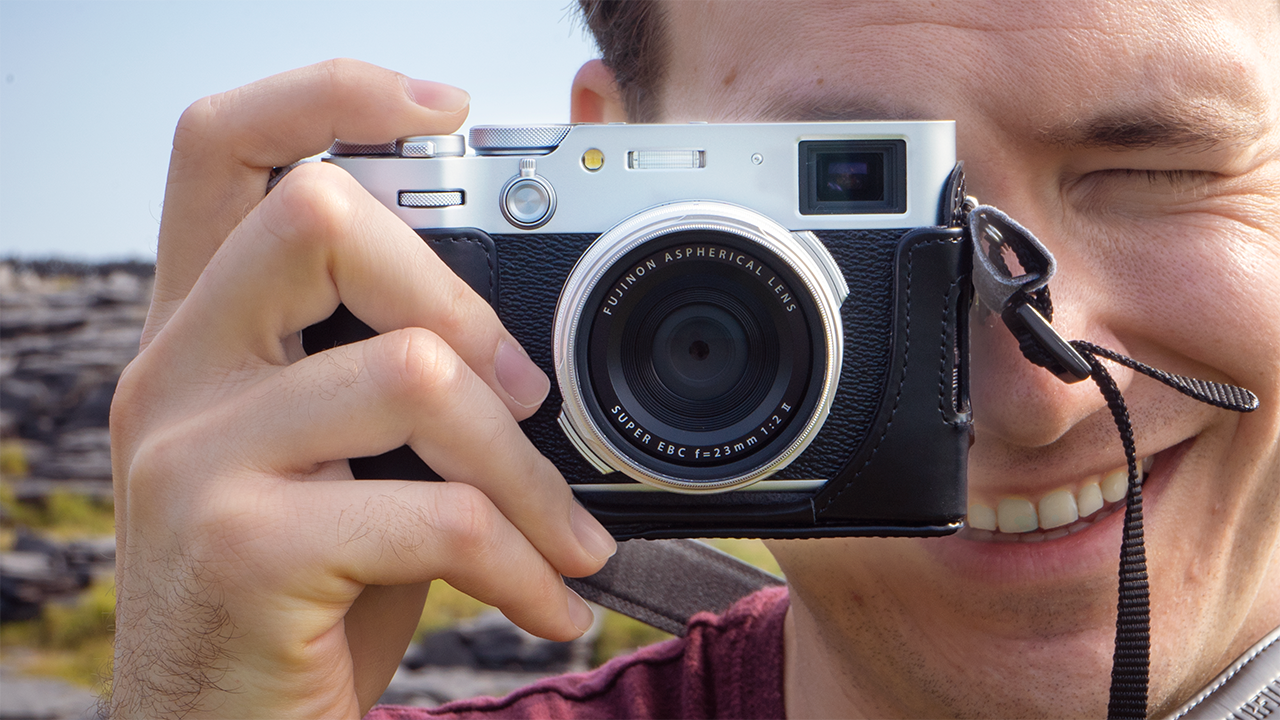
It’s been 6 months since I bought a Fujifilm X100V, the most sought-after digital camera in the world right now. So after taking well over a thousand photos with this camera and bringing it on three different trips over the past 6 months, I’m going to take you through if I think this camera has been worth having and if I think the fervor over this camera truly marks the comeback of the dedicated point-and-shoot camera.
Photo Quality
The first thing we have to talk about with this camera is photo quality. It just takes stunning photos that don’t look like they’ve been overprocessed to hell like a lot of modern smartphone images. There are a few different technologies that have been stitched together with this camera to get you those fantastic images. The first one being this camera has a much larger image sensor than your typical smartphone. The X100V boasts a 40.2-megapixel crop sensor. To give you an idea of its size, it’s about four times larger than the latest iPhone 16 Pro Max’s main camera image sensor. While the iPhone sensor has 48 megapixels, each individual pixel is much smaller than the pixel size of the Fuji sensor. The larger the pixels are on an image sensor, the more light they’re typically able to capture. Smartphone camera sensors try to get around this issue by using a technique called pixel binning, which groups pixels together on the sensor so they act as one giant pixel but at the cost of reduced resolution. The X100V’s sensor doesn’t have this compromise. You get crisper images with superior depth of field, and I think these images are generally better for printing out and framing than images taken from a smartphone. It also has a decent burst mode for subjects in motion, which is especially good for kids and pets.
Color Reproduction
But lots of cameras can give you good resolution. What I really think sets the Fujifilm apart from a lot of the competition is its color reproduction. Straight out of camera, color often doesn’t need any adjustments, which is certainly not the case for many dedicated cameras out there. In fact, a lot of people just use this camera and shoot straight to either JPEG or HEIF, though I’m not exactly sure that is the best idea. I’ve actually found over the past six months the mode I typically use the most on this camera is JPEG plus RAW. The reason I do this is because of Fujifilm’s film simulations. They’re built-in color profiles that simulate different kinds of Fujifilm film stock, which I found is vital to creating different artistic looks with this camera. You can easily map the film simulations to the control dial on the camera, which makes it easy to quickly cycle through the 20 different film simulations and preview them in real-time as you compose your shot. Figuring out which one to choose has been some of the most fun I’ve had shooting with a camera in a long, long time.
Film Simulation Bracketing and RAW Shooting
But having 20 film simulations to choose from might make you wonder, “Well, what if I pick the wrong one?” Or, “What if I just want to take a single shot but have the camera spit out multiple images with different film simulations?” For that specific scenario, the camera has a film simulation bracketing mode where you can choose up to three film simulations to include in your bracket. So you just capture one shot, but you’ll get three different images. But the film simulation bracketing mode doesn’t solve the problem of you choosing the wrong film simulation. That’s where shooting in JPEG plus RAW or just RAW comes in handy. With the Fujifilm X100V, you can import your RAW files into Adobe Lightroom and then apply any of the 20 film simulations that you want to it. It’s also useful for when the camera made a specific choice that you want to correct. Sometimes with this camera, your photo may appear too dark or too bright, and you want to recapture some of the detail in the image. Well, if you just shoot JPEG images, you won’t be able to recapture as much dynamic range and image detail as you can with a RAW file.
Real-World Usage and Storage Considerations
In my most recent trip to Iceland and Ireland, for example, I found about 10 to 15% of all of the photos I wanted to keep that I took with the Fuji needed some sort of edit, whether that was readjusting exposure, shadows, highlights, choosing a different film simulation, or a few more advanced edits like using generative AI to take people out of the background of certain shots. Now, RAW files do take up two to six times the size of a normal JPEG image, so going with my approach is going to take up way more storage. But given this camera can’t read the fastest SD cards anyway, I’d suggest just getting a 256 or 512 GB slower speed SD card, which will run around $50 to $70.
Design and Physical Controls
So that’s image quality, but the other thing that really stands out with this camera is its design. The Fujifilm X100V just looks stunning in person. It comes in two colors: silver and black. It looks sleek as hell, and unlike most modern tech products, it has dials and physical buttons everywhere. They can be rotated, pressed in, pulled out. There are so many great physical controls on this camera that just make it a joy to use. Most of the writing you see on the metal is actually engraved, giving it this premium feel. It has a built-in ND filter, which stands for neutral density, which is a convenient feature when shooting in bright light. And the control dial can be remapped to other functions, such as cropping the image sensor for a 70 mm focal length equivalent.
Viewfinder
The viewfinder is another standout feature. First, there’s a dedicated viewfinder selector button. It switches the viewfinder from optical to electronic. The optical viewfinder still has a cool heads-up display overlay. You can also turn on a small electronic rangefinder window when using the optical viewfinder. When you’re in single-point autofocus mode, it’ll verify whether the thing you want the camera to focus on is actually in focus. Another advantage of having an optical viewfinder is that it shows you what’s outside of the frame to make shot composition easier. The shutter button is threaded for shutter button accessories, which you can get from many different retailers, though I do have to say the one that came bundled in with the shoe cover from SmallRig that I have is quite nice, and I’ll leave a link to that in our blog post on 6monthslater.net.
Fixed Focal Length and Versatility
Now, one thing you might already know about this camera is it has a fixed focal length of 35 mm. You’ll see a lot of photographers and videographers reviewing this. They live in big cities, and they all basically say the same thing: this camera is amazing for street photography. If you don’t live in a big city or you do not care about cityscape shots, you may be wondering like, “Okay, that’s great, but can I actually use this camera for like more like normal camera things?” Well, I’ve gotten excellent landscape shots, close-ups, and images of people and pets out of this camera that have simply just looked stunning. Now, the only scenarios I’d say this camera really isn’t good for is if you want a telephoto shot or you want a really wide shot. Sure, it has a telephoto equivalent with the digital teleconverter, but that’s just a sensor crop, meaning you’re losing resolution when you use that feature.
Comparison to Interchangeable Lens Cameras
Now, Fuji does make a teleconverter lens for this camera that you can buy to get full-res telephoto shots, but I’d argue once you have to start carrying around conversion lenses with this camera, it kind of defeats the design purpose of a fixed lens camera like this, and you’d be better off going with a camera that’s designed for interchangeable lenses. Speaking of which, I brought both my Sony A7 Mark II and Fujifilm X100V on my recent trip to Ireland and Iceland, and about the only time I ever reached for my Sony, which had a 28 mm to 70 mm zoom lens attached, was when I wanted to get a photo of something farther away in the distance or when I really wanted that specific compression look that you get with a telephoto lens. But most of the time, because it’s less bulky, has better color science straight out of camera, I don’t end up having to edit every single image I take with it like I have to do with my Sony. I ended up using the Fuji most of the time on my trips.
Size and Protection Options
The size of the camera is another highlight, though one I struggled with early on because I had a lot of different options for how exactly I wanted to go about protecting it. At first, I thought, “Oh, I’ll just get a case for this camera. It’s so small, I don’t need to put it in a bag.” But the two cases I tried, one from Fujifilm and the other one from SmallRig, both had this external flap which provided good camera protection when not in use. However, once you actually want to start using the camera, you open up the flap here, and uh, there’s not really a good place to put this flap. I basically realized, “Okay, this isn’t for me. I need to find another solution.” Also, because I started getting more accessories for this camera than I expected.
Accessories and Weather Resistance
One accessory I got was the adapter ring and UV filter combo from Fujifilm. Now, I didn’t just get this to protect the lens itself. When you put this on, this is actually the only way to make this camera completely weather-resistant against some light mist, rain, etc. And boy, was I glad I had done that to the camera before my trip to Iceland, where the camera got a decent amount of water on it from taking photos of waterfalls in the mist. Now, you can also get the adapter ring lens hood combo from Fuji that has the lens hood, which is another accessory that I found useful for trying to eliminate some occasional glare from the sun in certain shots. Another accessory I bought was an extra battery for the camera, which I typically do for any camera I own, though even after a full day of shooting photos, I’ve never actually gotten this camera to run out of battery. It’s rated for 450 photos when using the optical viewfinder and 310 photos when using the electronic viewfinder.
Camera Bag
So given the amount of accessories I accumulated for this camera, it then became clear that yes, actually, I do want a bag for it. And for my big two-week trip, I knew I’d be carrying my regular DSLR as well as the Fuji, so I wanted a bag that could fit both of those as well as storage for all of my accessories. But importantly, since I was going to be hiking with this thing, it needed to be a bag that was as lightweight as possible and comfortable to carry. And I ended up buying the perfect bag for my needs, which is the Venture Sling 10L Camera Edition bag from Bellroy. The bag has a water-resistant exterior, which I can confirm survived a rainy day and being right up next to two very large waterfalls, and all my gear stayed dry on the inside.
Bag Features and Comfort
The interior of the bag features this padded and stretchy material, allowing you to adjust the dividers to fit whatever gear you need to put in there. So you could have two cameras and a lens like me, or one camera body and two lenses. The zippers open up from either side and are quick to use one-handed. There are detachable tripod carry straps. The front pouch is great for things like my lens hood, caps, and microfiber cloths, and there’s a nifty little key clip in there as well. The interior zipper pouch has sewn-in compartments perfect for all of my extra batteries, SD cards, and more accessories, and they even added a little AirTag slip pocket as well. Best of all, Bellroy uses this nifty little buckle here for quick adjustments, so you can loosen the bag to get into it easier or tighten it against your back when it’s not in use.
Bag Comfort and Sponsorship
I found the shoulder pad to be extremely comfortable. I took this on my two-week trip, and sometimes I was wearing this bag for hours or just all day outside, and the bag never felt sore or uncomfortable. I actually ended up liking this bag so much I reached out to Bellroy. They’ve been a sponsor before on the channel to see if they’d be interested in sponsoring this video as well as providing any of you a discount code if you’re interested in picking up one of these bags, and they thankfully agreed. So you can use the link in our description for 10% off the camera sling, which is backed by a 3-year warranty, as well as anything else you see on Bellroy’s site. Every purchase made using our link helps support the channel.
Fuji App and Connectivity
Another standout feature is the Fuji app. The app lets you easily update the camera’s firmware, view the health status of the device like shutter movements, back up your camera settings. There’s also a setting to automatically download photos as you take them to your smartphone over Bluetooth, which is perfect for trips. The app also has a feature that will automatically sync the location of the photos taken with your phone’s GPS data, though I found it to be inconsistent. Sometimes it’s worked, sometimes it hasn’t. Also important to note, you can use this camera as a webcam when you connect it to a computer via USB-C. All you need to do is toggle the webcam mode on in the Connection menu in the camera, and you’re good to go.
Video Performance
Now we’ve only really talked about photos up until this point, but what about video? The video performance is decent. I think it would be a fine camera for video every now and then. There is still a bit more rolling shutter than you want, but I do like that you can apply the film simulation looks directly to your videos, though unlike with shooting in RAW, they’re baked into the video, and you can’t change them after the fact. Also, the image stabilization is just okay but not as good as your smartphone. Another annoying thing with the video is the exposure adjustments as you film aren’t very smooth, especially compared to similar shots from my smartphone cameras like an iPhone or Pixel.
Downsides: Low Light Performance
All right, so those are all of my highlights with the experience of the Fujifilm X100V. Now let’s talk about downsides, and the first one is its low light performance. In indoor lighting scenarios where the lighting isn’t great and you’re shooting mostly in auto mode, I found too often that you’ll get noisy images. You can mitigate some of this with Adobe Lightroom’s crazy good denoise AI, but that’s still an extra step. Another downside was the packaging and unboxing experience with this camera. I didn’t feel like I bought this special camera when I opened the box. It just felt very plain and ordinary. Fujifilm should definitely take a page out of Apple and others’ playbooks for how to package their products.
Downsides: Subject Detection and Learning Curve
Another downside was subject detection. The camera has two separate modes for detecting people versus animals, but ideally, this camera should have a mode that automatically detects both people and pets without me having to do anything in switch modes. To make these adjustments a bit quicker, I use the custom settings feature. This saves camera settings like autofocus detection preferences as well as color profiles, and then I mapped the custom settings feature to the Fn button. So when I press it, I can easily swap between people and pets.
The next downside with this camera is the learning curve. When you go into a settings menu on a camera like this, it’s just… it’s like if Adobe made Photoshop into a camera. Now thankfully, yes, if you just want to set everything in Auto, take a few photos, play around with the film simulations, you can get away with doing all of that and come away with pretty good-looking photos straight out of camera. But if you want to learn about pretty much everything this camera can do, the learning curve is a bit steeper than you might expect, especially if all you’re familiar with is taking photos on a phone. To really get a good understanding of everything this camera can do, I ended up spending hours going through every feature and function in the manual to see what they were, how they worked, and whether or not I’d find them beneficial. Now, I made a lot of notes when I was going through the manual of some important things with this camera, and I’ve left those notes in our blog post on 6monthslater.net for those interested.
Minor Gripes: Shutter Mechanism and Sensor Size
Another minor gripe I have with this camera is with the shutter mechanism. The leaf shutter just feels a bit cheap compared to other cameras that have a nice satisfying click or snap sound when you take a photo with them. Now, another thing you might hear some people complain about with this camera and other Fuji cameras is they are not full-frame cameras, but is that really a downside? Full-frame sensors typically offer better low light performance because they have larger individual pixels. This can also give them better dynamic range performance, and they often have a wider field of view as well. Plus, from a historical perspective, they are closer in size to 35mm film, which is a long-established standard for professional photography. But for this camera, for most people, does it matter? No, I don’t think it does.
JT
please do the same for this text as well: Now the last big downside I have with this camera, and most other dedicated cameras, there is just no anti-theft technology built into this thing at all. And given how in demand this camera still is, having it stolen is something to be concerned about. And in an age where our smartphones and other tech have way more robust security features and authentication methods, I think it’s time cameras have better anti-theft technology too. So after 6 months with the Fujifilm X100V, do I recommend getting one? Yes, this is a camera I can generally recommend. Now, the Fujifilm X100V, it’s not the camera for everyone, and it’s still going to come with the benefits and baggage that you see with dedicated cameras like the semi-steep learning curve for photography beginners compared to your average smartphone. But smartphone camera systems can only get you so far. Things like sensor size, optics, those do matter, and the overall experience of using an object designed for the single purpose of taking photos and videos, in my experience, is better than doing it with a smartphone. But specifically, who do I recommend this camera for? The first group is current DSLR camera owners who are interested in a camera like this that’s a bit more pocketable, fun to take around to parties, on trips, events, places where you don’t want to have to carry around a more bulky camera and a bunch of lenses. But note, I wouldn’t recommend this camera as a professional photography camera. You’d want to go with something else that has interchangeable lenses, or for those who want to do a lot of video, there are better cameras on the market for video, like those from Sony, which I personally use. Now, the second group of people I think this camera would be perfect for is those who are mainly doing smartphone photography. If you want to take better-looking photos than what most smartphone cameras are capable of, if you want shadows in your photos again, and if you want more control over how your images look with film simulations and shooting in RAW, well, I think this might just be the camera for you. If you’re interested in learning more about the Fujifilm X100V, as well as links to all of the accessories that I’ve mentioned, I’ve put all of that in our blog post at 6monthslater.net. Link to that in the description. And if you enjoyed this review, you might also like some of my other popular 6 Months Later reviews, like my review of the Meta Ray-Bans, the Apple Vision Pro, and the Kindle Scribe, and you can get to all of those by clicking on the playlist above. And if you own this camera or other Fuji cameras, let me know what you think of Fuji cameras. What do you think of this one specifically? Let me know down in the comments. For 6 Months Later, I’m Josh Teder. Thanks for watching.
Here’s the text with H3 headers added:
Downside: Lack of Anti-Theft Technology
Now the last big downside I have with this camera, and most other dedicated cameras, there is just no anti-theft technology built into this thing at all. And given how in demand this camera still is, having it stolen is something to be concerned about. And in an age where our smartphones and other tech have way more robust security features and authentication methods, I think it’s time cameras have better anti-theft technology too.
Final Recommendation
So after 6 months with the Fujifilm X100V, do I recommend getting one? Yes, this is a camera I can generally recommend. Now, the Fujifilm X100V, it’s not the camera for everyone, and it’s still going to come with the benefits and baggage that you see with dedicated cameras like the semi-steep learning curve for photography beginners compared to your average smartphone. But smartphone camera systems can only get you so far. Things like sensor size, optics, those do matter, and the overall experience of using an object designed for the single purpose of taking photos and videos, in my experience, is better than doing it with a smartphone.
Who Should Buy This Camera
But specifically, who do I recommend this camera for? The first group is current DSLR camera owners who are interested in a camera like this that’s a bit more pocketable, fun to take around to parties, on trips, events, places where you don’t want to have to carry around a more bulky camera and a bunch of lenses. But note, I wouldn’t recommend this camera as a professional photography camera. You’d want to go with something else that has interchangeable lenses, or for those who want to do a lot of video, there are better cameras on the market for video, like those from Sony, which I personally use.
Now, the second group of people I think this camera would be perfect for is those who are mainly doing smartphone photography. If you want to take better-looking photos than what most smartphone cameras are capable of, if you want shadows in your photos again, and if you want more control over how your images look with film simulations and shooting in RAW, well, I think this might just be the camera for you.
Featured Products

$2,358.00

SanDisk 256 GB Extreme PRO SD Card
$29.99

Sony Alpha 7C II Full-Frame Interchangeable Lens Camera
$2,198.00
Note: Great camera choice if you want to focus on video but have a slim profile like the X100VI gets you.

$2,189.95

$161

Fujifilm X-T5 Interchangable Lens Camera with 50mm Kit lens
$2,099.99
Note: Great choice of camera if you want film simulations like the X100VI, the same sensor and similar look and feel, but also want interchangeable lenses.

SanDisk 512 GB Extreme PRO SD Card
$69.50

SmallRig Thumb Grip with Hot Shoe Cover for X100VI (Silver and Black)
$16.99

Sony a7 III Full-Frame Mirrorless Interchangeable-Lens Camera
$1,798.00
Notes from FUJIFILM X100VI Menu and Manual
Button and Dial Overview
- F1n: Unmarked button on the top
- F2n: Unmarked button at the front
- Control Ring/Focus Ring: Same thing
- Command Dials: Dials on the front and back
- Can be rotated AND pressed in
- Focus Stick: Selector button on the back
- Used to select things in the menu
- Helps select focus area
- Q Button: Quick settings button on the back
- Delete/Drive Button: Displays drive button menu
Key Terminology
- Sensitivity: Synonymous with ISO on Fuji cameras
- T on shutter dial: Moves shutter speed selection to rear command dial
- B (Bulb) on shutter dial: Keeps shutter open for 60 seconds for long exposure shots
Focus Mode Switch
- S: Single Auto Focus – Focus locks when shutter button is pressed halfway
- C: Continuous Auto Focus – Focus adjusts continuously as subject moves
- M: Manual focus using the control dial
Shooting Modes
- Mode P: Camera chooses shutter speed and aperture
- Mode S: Choose shutter speed, camera adjusts the rest
- Mode A: Choose aperture, camera sets the rest
- Mode M: Manual – User controls shutter and aperture
Movie Recording Settings
- Set Aperture, Shutter, and ISO to Auto
- Change Focus Mode to C or M (not S)
- Select “Movie” in Drive menu
- Use shutter button to start/stop recording (default)
Focus Adjustment Settings
- Face/Eye detection OR Subject detection (not both)
- Release/Focus Priority for AF-C and AF-S modes
- Auto Exposure Bracketing
Focus Points
- Use focus stick to select focus point
- Use rear dial to widen auto focus frame
- Face detection available if enabled
Digital Teleconverter
- Allows sensor crop to 50mm or 70mm equivalent
- Works with RAW shooting (saves full image with crop metadata)
- Compatible with conversion lenses
Metering Modes
- Multi (recommended): Uses color, brightness, and composition
- Center Weighted: More weight to center of frame
- Spot: Uses 2% of frame
- Average: Average for entire frame
Recipes (Custom Settings)
- Saved custom settings (like custom film simulations)
- Compatible with RAW images
Custom Menu Settings
- Create a personalized settings area
- Access: User-setting > My Menu Setting Photo (or Video)
Quick Menu Setup
- Customize via Button/dial settings > edit/save quick menu
Display Custom Settings
- Settings > Screen Settings > DISP Custom Setting > Choose OVF or EVF
Aperture Control via Dial
- Button/Dial Setting > Aperture Ring Setting (A)
- Auto: Aperture set to Auto when Ring selects A
- Command: Aperture set by back dial
Custom Settings
- Long press Q in Quick Menu to set up
- Used for quickly switching between favorite custom settings
Learn More
Fujifilm X100VI SD Card Compability Chart
JPEG vs. RAW differences – Adobe
How we were able to score an X100VI – HotStock (we used the paid version and ran it on an iPad for a month)